Use the Scheduling Assistant and Room Finder for meetings in Outlook
If you use an Microsoft 365 or Microsoft Exchange account with Outlook, you can use the Scheduling Assistant and Room Finder to help schedule your meetings.
Use the Scheduling Assistant
From the Inbox, select New Items > Meeting or in the Calendar, select New Meeting. You also can use the keyboard shortcut Ctrl+Shift+Q to create a new meeting request.
Add attendees in the To box.
In the Subject box, enter a description of the meeting or event.
Select Scheduling Assistant from the Ribbon. You'll see a row for every recipient you entered in the To box. If you want to add more attendees, you can type their name in any blank row in the Scheduling Assistant.
Times that your attendees are busy are shown in dark blue. Times that your attendees have a tentative appointment are shown in a light blue hashed block, and times outside of your attendees' working hours are shown in light gray. Select an available time for all of your attendees.
To select an optimal time for all of your attendees, use the Room Finder in the right column. You can see what times your attendees have conflicts.
Use the Room Finder
In a new meeting, select the Scheduling Assistant button on the ribbon.
Use the Show a room list drop-down to pick a list of rooms. These lists are set up by your Microsoft Exchange or Microsoft 365 administrator.
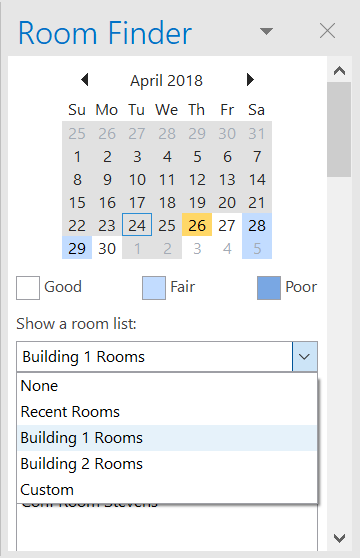
Select an available room to add the room to the Scheduling Assistant and to the meeting as a recipient.
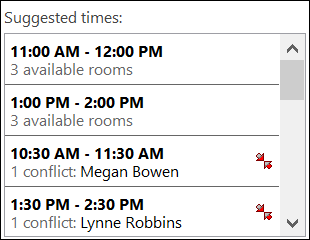
The Suggested Times pane locates the best time for your meeting, which is defined as the time when most attendees are available. The best meeting time appears at the top of the pane. To select any one of the suggested times, click the time suggestion in the Suggested Times pane. You can also manually select a time on the free/busy grid.
If you want to make the meeting recur, on the Meeting menu, in the Options group, click Recurrence, select the recurrence pattern, and then click OK.
When you add a recurrence pattern to a meeting request, the Meeting menu changes to Recurring Meeting.
When you're done setting up your meeting, click Send.
Related Articles
Open and Use a Shared Mailbox in Outlook on the web
A shared mailbox makes it easy for a group of people to monitor and send email from a public email address. When a person in the group replies to a message sent to the shared mailbox, the reply appears to come from the shared address, not from the ...How to add a POP or IMAP email account to Outlook for iPhone or Android
Some service providers provide an email account that is accessed via IMAP or POP. Outlook for iPhone When you set up an email account using IMAP or POP, only your email will sync--not calendar or contacts. What is IMAP and POP? To set up a POP ...Add a IMAP or POP email account to Outlook
Reference: https://support.microsoft.com/en-us/office/add-an-email-account-to-outlook-6e27792a-9267-4aa4-8bb6-c84ef146101b If the default add account does not work or properly detect your IMAP or POP account, use the following steps. Use advanced ...Add a shared mailbox to Outlook mobile
Add a shared mailbox to Outlook mobile Outlook for iOS and Android If you use Outlook for iOS or Outlook for Android, you can add a shared mailbox you have permissions to access on Outlook Mobile. Use a shared mailbox on a mobile device (phone or ...Outlook. Do not always ask before opening this type of file
https://www.msoutlook.info/question/do-not-always-ask-before-opening-attachment Do not always ask before opening this type of file When I double click on an attachment, I’m being asked whether I would like to open or save the file. I would like to ...